Moth Recording Techniques
Moth Recording Techniques
Due to their largely nocturnal habits, we seldom come into contact with moths, except perhaps at the kitchen window or whilst gardening. The best way of learning more about these fascinating insects is through the use of a moth-trap.
By attracting moths to a trap you are interfering with their natural life cycle and you are then responsible for their safety. After examination of the catch, the moths should be scattered in long vegetation, hidden from the eyes of hungry birds. Do not put them all in one place, as if a predator finds one it will find them all. Some people prefer to keep the moths safe in a cool place during the day, releasing them at dusk. Bird predation can be a problem, particularly if the moth-trap is operated regularly in the same place. It is probably fairer on the moths if you do not trap every night; alternatively, if your garden is big enough, vary the trapping location.
Building a moth trap
Moth traps use a 125W MBF mercury vapour (MV) light bulb to attract insects from the immediate area. MV bulbs are particularly attractive to moths due to the ultraviolet light in their spectrum. The moths fall into the trap where they remain unharmed until the next morning.
There are different types of trap, but the one that is best suited to DIY construction is the ‘Skinner’ trap, which is named after its designer. This type of trap is easy to carry about, and both easy and cheap to make.
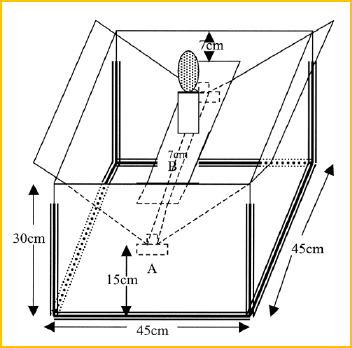
Shown here is an outline plan of a trap showing the standard measurements. As can be seen, it is basically a 45 cm square box with a bottom, which is 30cm high and made from 4mm plywood. The ‘lid’ is formed from two sloping sheets of 2mm Perspex with a gap between them at the bottom. The function of these Perspex sheets is to arrest the flight of the moth, funnelling it down into the trap.
Referring to the plan, two measurements are particularly important. The gap between the bottom of the two sheets of Perspex (marked A) must be 25mm to allow the moths to enter, but not too many to escape. The height of the top of the mounting blocks for the Perspex at A should be 15cm from the bottom of the trap. Small pieces of wood (2.5cm square) should be fixed to the centre of the top of the blocks (A) to keep the Perspex sheets 2.5cm apart. The Perspex must be cut (scored with a glass cutter or Stanley knife and then snapped off) to fit the particular trap. Lengthways the sheets must fit snugly between the sides of the trap (approximately 44cm) and the width of the sheets must equal the distance from the mounting block to the top edge of the trap, plus 3cm overhang (about 28cm).
There are 2cm square wooden lengths inside the trap running up each corner and along the bottom of the sides to hold the trap together. These are nailed (and glued) to the sides and bottom with tacks. Note that the vertical bits do not come quite to the top of the corners to allow for the slope of the Perspex. The plywood bottom of the trap holds the whole thing rigid and 6mm holes should be drilled in each corner to allow rainwater to escape.
The lamp mounting board (B) can be made from an odd bit of ply or other wood (7cm wide) and should be removable to facilitate emptying the trap.
The light source is traditional a Mercury Vapour (MV) bulb, however recent changes in legislation has now made these difficult to obtain, as they are to be phased out for environmental reasons. Actinic bulbs are also popular, although they emit less visible light than a MV bulb, they are almost as good, especially if using two 30W Actinic in tandem. A third light option are the new LED bulbs which many users claim are as effective as MV. One advantage of LED bulbs is that they can be operated from a 12V battery.
An MV lamp must be operated with a ballast, which moderates the power when it is first switched on, allowing the bulb to warm up gradually; the ballast must be of the same wattage rating as the bulb. The bulb holder has to be earthenware because of the heat (plastic holders melt). Wiring the system is fairly simple, the ballast interrupting the positive wire between the mains and the bulb. Normally it is at the mains end of the circuit to save carrying it about; if you are not very experienced at wiring electrical appliances it is advisable to seek the help of a professional electrician. It is advisable to cover the bulb in the field with a glass jar, or with a supported Perspex shield (but make sure it is about 50mm clear of the bulb, or it will melt with the heat from the bulb), as a drop of rain falling on the naked hot bulb can crack it. Should the outer shell of the bulb crack, do not use it as this could result in damage to the eyes. In any case it is not advisable to look at the bulb for long periods due to its extreme brightness.
Actinic bulbs similarly operate via a ballast, and the ballast must match the wattage of the bulb(s). As Actinic bulbs run cold, there is no need for a rainguard, but care should be taken not to look at the light directly.
UV LED bulbs are very energy efficient, can be run from batteries and, needing no ballast, are lightweight. Therefore these bulbs are a good option for portable traps used in locations where there is no mains power supply. Some people have experimented with using a combination of different coloured UV LED bulbs in a single trap although in these cases the extra power needed may necessitate mains supply. As with other bulbs, looking at the light directly can damage your sight, so use appropriate eyewear that blocks UV rays.
Finally, obtain 3 or 4 square egg trays, usually available free from a corner shop, for the moths to sit on. These are normally about 30cm square and should be cut in half. They stand up, resting on the sides of the trap under the Perspex.
As far as siting the trap goes, the ideal location is somewhere sheltered but not too enclosed. Some thought should also be given to the position of the sun in the morning as the heat of direct sunlight increases the moths’ activity and can also result in death through overheating.
Sugaring
You will need:
- 454g Tin of Black Treacle
- 1kg Brown Sugar, (the darker the better)
- 500ml Brown Ale (for the moths not you!)
- Paint brush
Slowly heat the ale in a large pan (DO NOT BOIL) and simmer for five minutes. Stir in and dissolve the sugar, followed by the treacle and then simmer for two minutes. Allow to cool before decanting into a container. A drop of rum stirred in just before use is recommended but not essential. Paint the mixture at eye level onto 10 – 20 tree trunks or fence posts just before dusk, being careful not to paint over mosses and lichens, and check for moths by torch-light for the first two hours of darkness. You should make sure you have the owners permission for this activity.
Feel free to use your own recipe if desired.
Wine ropes
You will need:
- Bottle of cheap red wine (definitely not for you!)
- 1kg sugar
- 1m lengths of thick cord, light rope made from absorbent material. Strips of fabric or muslin can also be used.
Heat the wine (DO NOT BOIL) and stir in and dissolve the sugar. Allow to cool and soak the lengths of rope. Drape the “wine ropes” over low branches, bushes or fences just before dusk and check for moths by torch-light for the first two hours of darkness.
Feel free to use your own recipe if desired.
Moth trapping tips
- The highest catches are on mild, cloudy, still nights with no moon. Fewer moths fly when there is a full moon. Steady drizzle will often improve catches, but heavy rain and strong wind is best avoided.
- Check your catch as early as possible in the morning before the sun start to shine and before birds become attracted to any moths that have landed outside the trap.
- If you trap in the same place on consecutive nights, release the moths away from the line of sight of the trap so that the majority aren’t re-caught immediately. Although moth trapping doesn’t directly harm moths, they are unable to get on with the important tasks of feeding and reproduction while confined.
- Avoid touching the moths when you inspect them, as you may harm them. To put them in a container gently lift the moth from underneath using a pencil, or rough cardboard tray, as they will grip onto rough surfaces.
- Release moths at dusk, or keep them on egg trays in a part open container in a sheltered place out of the reach of birds etc. from which they can fly out by themselves at night. If you need to release the moths during daylight, place them among vegetation where they can hide away from birds or other predators. If you do this regularly it is a good idea to vary the release location so that birds do not learn the location of “fast food”!

Atropos Subscriptions
Available by subscription only, Atropos is the magazine for butterfly, moth and dragonfly enthusiasts. Find out more about the unique content and how to subscribe.